Figuring out the number of months between two dates in Excel might sound simple, but it opens up a world of possibilities for managing projects and budgets better. With tools like Excel, you can calculate these differences through several methods, such as subtraction and using functions like DATEDIF, YEARFRAC, plus formulas involving YEAR and MONTH.
Whether you’re looking into financial management or setting timelines for tasks, knowing how to work out the months between dates is crucial. But sometimes, problems pop up with these calculations.
Lucky for us, there are ways to solve common issues to get clear results every time. For those who love diving deeper, we’ll even cover advanced techniques like figuring out partial months for an exact figure down to decimal points.
Beyond just numbers, applying this knowledge has real-world uses too. Imagine combining VLOOKUP with date functions or using conditional formatting based on what you find from your date math; the impact on how data looks and feels can be significant.
Ready? Let’s get started!
Importance of Calculating Months Between Two Dates in Excel
Calculating the number of months between two dates in Excel helps with financial and project management tasks. This process is key for making smart decisions about project timelines and where to use money.
For example, a data analyst might use this method to see how long a marketing campaign should run or decide when to launch a new product based on customer behavior analysis.
Mastering the calculation of months between two dates in Excel can significantly influence your decision-making, ensuring projects stay on track and within budget.
Using Excel for these calculations allows people to spot trends, make forecasts, and manage work more efficiently. Whether you’re working on a detailed report for senior management or planning your next big project milestone, knowing how to calculate this time span accurately saves time and resources.
Excel References: Absolute vs. Relative
Excel lets you use two types of references when working with formulas: absolute and relative. Absolute references stay the same no matter where your formula moves in your spreadsheet.
They are like a fixed point on a map, guiding Excel to look at the same exact cell every time. You mark them with dollar signs, like $A$1. This means if you copy a formula down a column, the reference to $A$1 stays constant.
Relative references change based on where you place or move your formula. Think of them as directions that shift depending on your starting point. If your formula in cell B2 refers to A2 without any dollar signs and you copy it to B3, the reference changes to A3 automatically.
This flexibility is helpful for applying the same operation across multiple rows or columns efficiently but can cause errors if not used carefully.
Understanding how these work together lets you control Excel’s calculations precisely for tasks such as calculating months between two dates—a common need in data analysis and financial forecasting.
Next up, let’s dive into understanding Excel formulas for date calculations.
Understanding Excel Formulas for Date Calculations
Moving from the basics of Excel references, let’s dive into the heart of date calculations. Mastering formulas for these calculations opens up a whole new level of precision in your work.
You’ll learn to play with MONTH and YEAR functions like a pro, extracting just the parts you need from any date. But tread carefully – crossing year boundaries can trick you if you’re not paying attention.
You might use the TEXT function to format dates nicely, but remember—this tool needs careful handling across different years. Sometimes, adjusting your formula is necessary to keep things accurate and reliable.
With each step forward in understanding these functions, you edge closer to being an Excel wizard who can manipulate dates with confidence and clarity.
Methods for Calculating Months Between Two Dates
Finding the number of months between two dates in Excel opens up a world of possibilities. Excel has several functions like subtraction, DATEDIF, and YEARFRAC that make these calculations easy and fast.
Using Subtraction
You can find the number of months between two dates in Excel using a simple subtraction method. First, type your start date in one cell and the end date in another. Then subtract the start date from the end date.
This gives you the total days between two dates. To convert these days into months, divide by 30 since most months have around 30 days.
Subtraction is a straightforward way to calculate time differences.
This approach works well in WPS Office and Google Sheets too. It helps users on various platforms such as Windows, macOS, Linux, iOS, and Android quickly figure out month counts without complex functions or formulas.
Keep it simple – use subtraction and division for quick answers right at your fingertips!
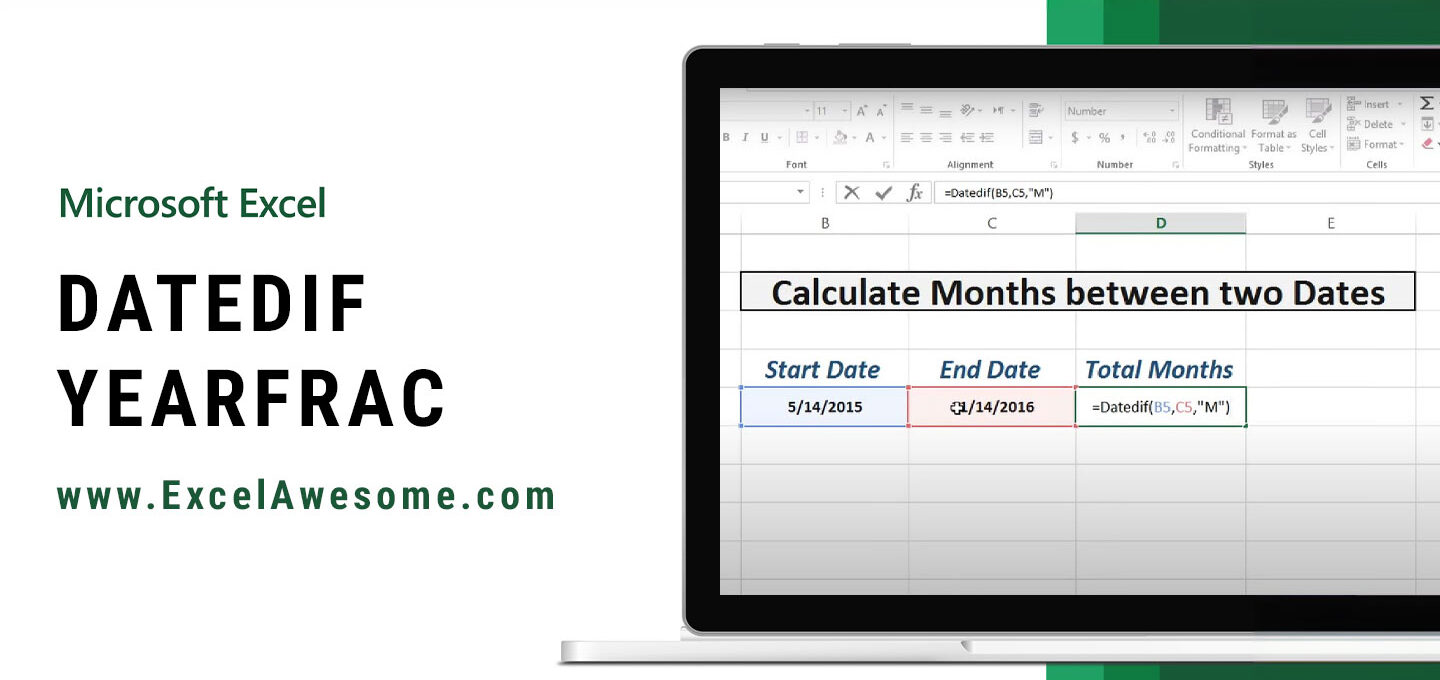
Utilizing DATEDIF Function
The DATEDIF function helps you find the number of months between two dates in Excel. You use it by typing =DATEDIF(start_date, end_date, "m") into a cell. This formula is very useful for projects or work where tracking time periods is critical.
For example, if you want to know how long a project has been running or the time between ordering and receiving goods.
This function comes from Lotus 1-2-3, an older program similar to Excel. Because of this history, some might call DATEDIF a compatibility feature—but it still works perfectly in Excel today.
If you need to calculate for the nearest whole month and consider days as well, just adjust your formula slightly by adding days to your end date: =DATEDIF(start_date,end_date+15,"m")
It’s a direct way to manage dates without getting lost in details.
Applying YEAR and MONTH Functions
Excel makes counting months between dates easy with YEAR and MONTH functions. First, pick your start and end dates. Then, use the YEAR function to calculate the years between them.
Multiply this by 12 for the months in those years. Next, add the difference from the MONTH function for both dates. This gives you all active months between your two chosen days.
Imagine starting in January 2021 and ending in March 2023. The YEAR function shows two years difference—so, 24 months. The MONTH function adds three more months for January to March.
Together, they total 27 months! With these steps, Excel turns a tricky task into something simple, letting you count every month accurately without missing a beat.
Adopting YEARFRAC Function
Adopting the YEARFRAC function in Excel helps you calculate the number of months between two dates accurately. This function returns a decimal value showing fractional years. For those who need whole months, combining the INT function with YEARFRAC rounds down to complete months.
This method gives you flexibility and precision in your date calculations.
Mastering YEARFRAC changes how we view time in spreadsheets.
This approach is perfect for projects needing detailed time analysis or financial models calculating interest over specific periods. With these tools, turning fractional years into useful monthly data becomes straightforward, setting the stage for advanced techniques like calculating partial months or troubleshooting common errors.
Advanced Techniques
Explore deeper tricks like figuring out part-months and fixing common mistakes to make your Excel work even sharper. These skills will take your date calculations to the next level, opening up new ways to use Excel for tasks big and small.
Keep reading to discover how you can apply these advanced techniques today!
Calculating Partial Months
Calculating partial months in Excel can get tricky, but with the YEARFRAC function, you’re set. This function turns the time between two dates into decimal values. It’s perfect for jobs needing a fine-tuned approach to time spans.
You might be dealing with financial prorations or need an exact count of days and months for a project timeline. The YEARFRAC function is your go-to tool here.
For more precision, combine it with other functions like DATE or NOW to capture specific start or end times down to the day. Imagine calculating the interest on a loan from the exact day you borrowed money till when you pay back, not just by month counts but by each day within those months – that’s where this technique shines.
Using Excel this way lets you handle detailed projects and keep track of time-sensitive tasks efficiently.
Addressing Common Errors and Troubleshooting
Working with dates in Excel can sometimes trip you up. Good news, though—fixing common errors and finding solutions is easier than you might think. Here’s how you can tackle issues when calculating the number of months between two dates in Excel:
- Check Your Date Formats: Dates must be in a format that Excel recognizes to perform calculations correctly. If your dates look right but don’t behave as expected, try changing their format through the Format Cells option.
- Ensure Correct Use of DATEDIF Function: The DATEDIF function is a powerful tool for calculating time intervals but is also prone to errors if not used correctly. Double-check that your start date is less than your end date, and review the unit parameter (“m” for months) to avoid unexpected results.
- Avoid Typing Errors in Formula: Typos are a common source of errors in Excel formulas. Make sure there’s no extra space or missing commas within your formula.
- Handling #NUM! Errors: This error often pops up if your formula attempts to calculate an impossible difference (e.g., negative time periods). Review your date inputs and ensure they are logically ordered.
- Dealing with #VALUE! Errors: If you see this error, it usually means one of your date references contains a non-date value or the formula syntax is incorrect. Verify each cell used in your formula only contains dates and that the formula structure aligns with expectations.
- YEARFRAC Function Precision: When using the YEARFRAC function for more precise calculations, remember its second argument specifies the day count convention to use (actual/actual, actual/360, etc.). Choosing the wrong type could slightly skew results.
- Troubleshooting Partial Months Calculations: Calculating partial months can get tricky since different methods yield slightly different results depending on how days are counted within a month. Experiment with both DATEDIF and YEARFRAC functions to see which aligns best with your needs.
- Excel Versions Matter: Certain functions may behave differently across various versions of Excel or might not be available at all in older versions. Always check that your method aligns with the software version you’re working with.
- Check for Hidden Characters: Sometimes, copying data from other applications introduces invisible characters that disrupt formulas—cleaning data using TRIM or CLEAN functions can help eliminate these pesky intruders.
- Use Conditional Formatting for Error Checks: Apply conditional formatting rules to highlight potential errors in date cells automatically—this will help you catch formatting issues before they cause trouble.
Once these troubleshooting steps have been reviewed, moving on to explore practical applications and use cases demonstrates how resolving common errors enhances data analysis capabilities significantly.
Practical Applications and Use Cases
Discover how Excel can transform your data analysis and decision-making with practical applications like using VLOOKUP for smarter date calculations and sprucing up reports with Conditional Formatting.
You’ll see just how versatile Excel is in managing dates, enhancing your projects, or making insightful marketing strategies come alive. Dive into more ways to leverage these skills effectively!
Utilizing VLOOKUP for Date Calculations
VLOOKUP stands as a powerful tool in Excel that can make finding specific information easy, even when working with dates. Imagine you have a long list of employees with their start and end dates, and you need to find the number of months they’ve worked.
By combining VLOOKUP with date functions like DATEIF or MONTH, you can quickly pull up an employee’s record and calculate this duration without scanning through hundreds of rows.
This method not only saves time but also cuts down on errors. You input the name, let VLOOKUP fetch the dates, and then let Excel do the math for how many months fall between those two points in time.
It’s making your data work smarter so you don’t have to work harder. This approach demonstrates how Excel’s functionality extends far beyond simple calculations—by integrating different functions together, your spreadsheet turns into a more dynamic and responsive tool that supports various real-world applications effectively.
Applying Conditional Formatting in Date Calculations
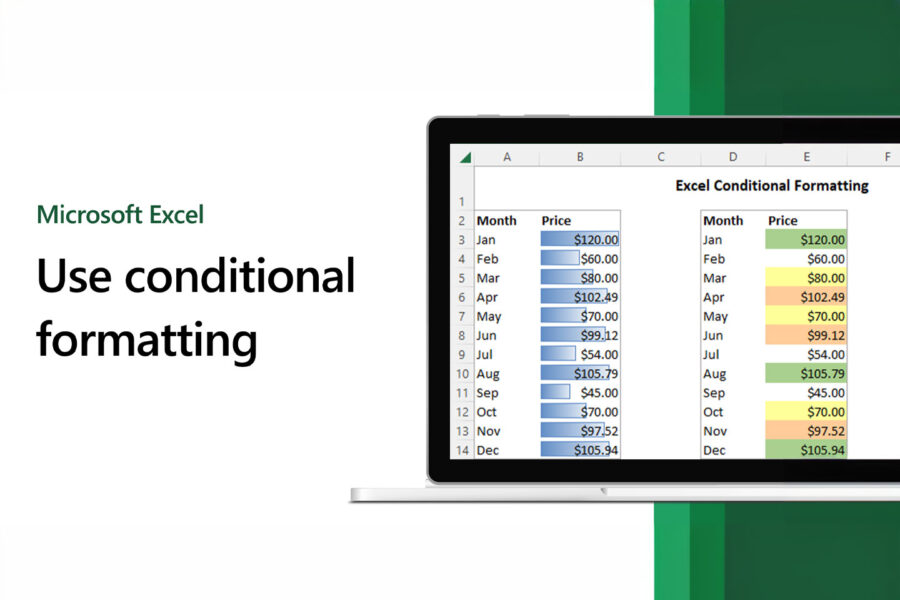
Conditional formatting in Excel shines by letting you highlight different date ranges. You set rules that change the color of cells based on dates. This way, you can see important info at a glance.
For example, past due items might turn red, while upcoming ones become green.
To start, pick the cells with dates. Then go to the “Format” menu and choose “Conditional Formatting.” Next, select “New Rule” and pick “Use a formula to determine which cells to format.” Here, write your formula based on your needs—like highlighting all dates more than 30 days old.
Finally, pick a format—maybe bold text in red—and click OK. Now, your sheet will automatically show colors based on those rules, making it easy to track deadlines or milestones visually without sorting through each date manually.
Conclusion
We’ve walked through different ways to figure out how many months pass between two dates in Excel. These methods are handy, simple to use, and quick. They make planning and managing projects a lot easier.
You learned about subtraction, the DATEDIF function, YEAR and MONTH functions, and the YEARFRAC function. All these tools help you get accurate results fast.
These strategies matter a lot because they can change how you handle data…you save time and reduce mistakes. You also saw some advanced moves like figuring out parts of months and fixing common slip-ups.
Plus, we showed how VLOOKUP and Conditional Formatting can make date calculations even smarter.
Think of using these Excel tips as keys that unlock better decision-making for work or personal projects. Every method has its place depending on what you need it for. Remembering these formulas lets you tackle any date-related question with confidence.
Keeping up with such tricks makes anyone more skilled at using Excel…and there’s always more to learn! For those eager to dive deeper, plenty of resources can guide you further into mastering Excel’s full potential.
Let this be your push towards becoming an Excel wizard; start experimenting today! Your newfound knowledge could be just what’s needed to solve problems faster or bring new insight into your data-driven tasks.
Finally—a personal shout-out: My journey with Excel began from curiosity but turned into an adventure that boosted my productivity hugely! Yours could too; why not start now?

Leave a Comment